Get step-by-step guidance for connecting, configuring, and managing your IPTECHVIEW ecosystem. Whether you’re adding devices, setting up integrations, or optimizing performance, this resource hub helps you get the most out of our platform, fast, simple, and secure.
IPT Camviewer One Instructions
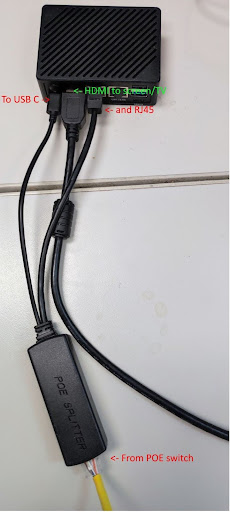
How to power and connect IPT-CAMVIEWER-ONE?
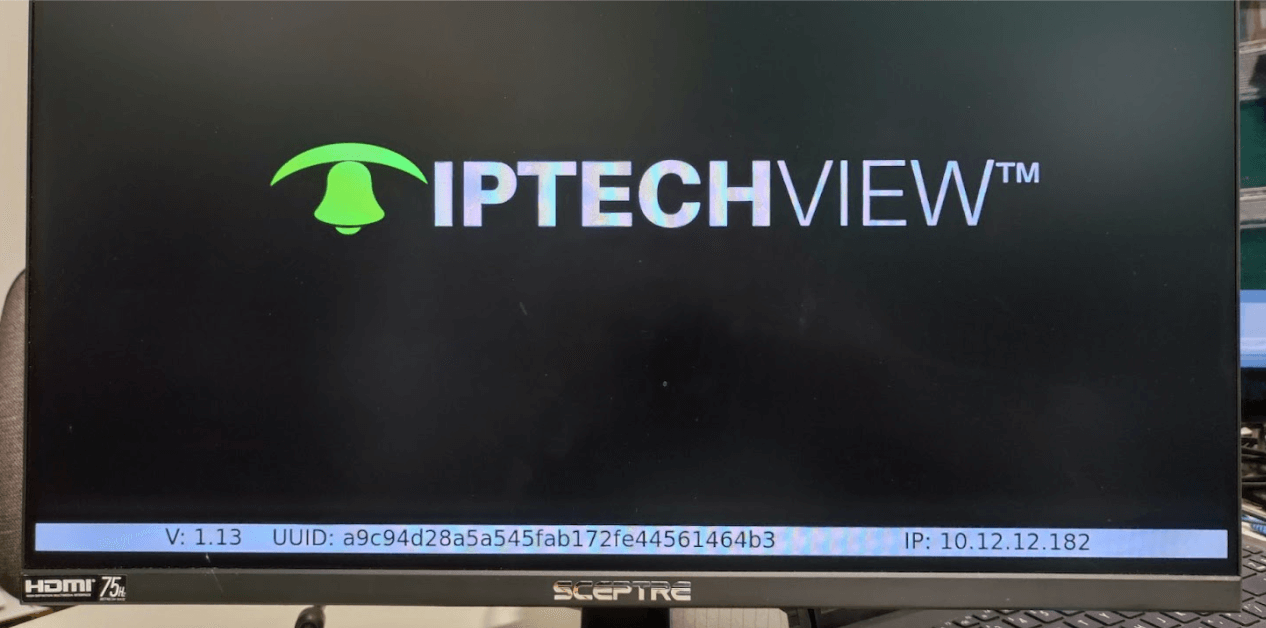
How to find the UUID?
Connect the IPT-CAMVIEWER-ONE on the TV screen over the HDMI plug and turn on the device, after a moment the device UUID and the IP are shown around 10 sec.
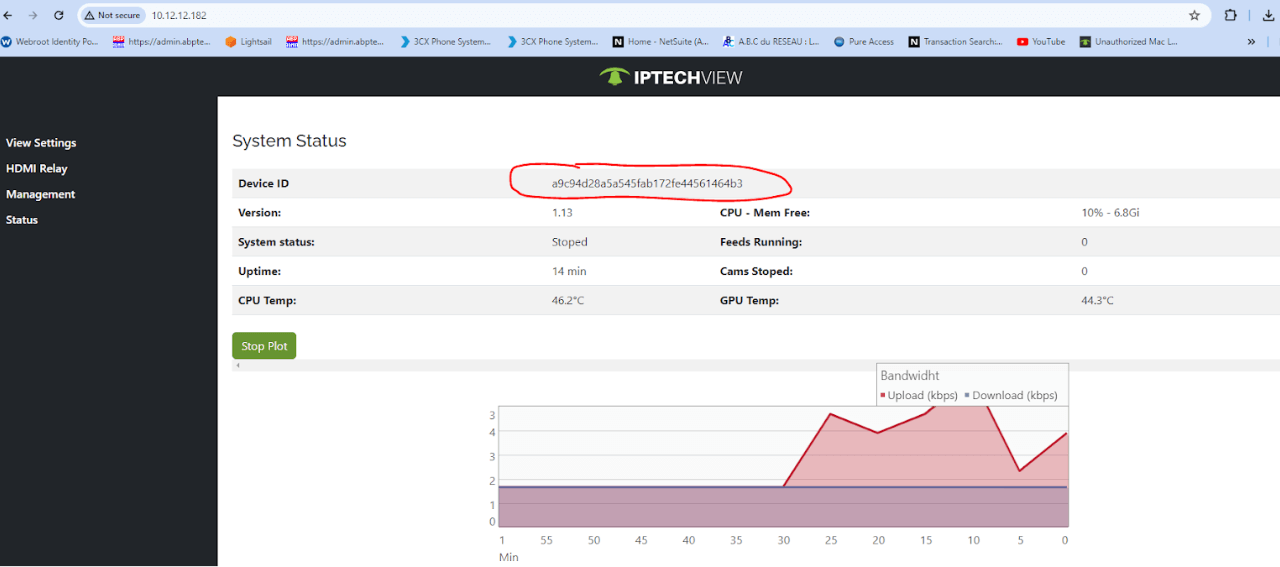
Get the IP and insert in your favorite browser.
Device Default username: admin password: admin
Copy the UUID
Device Registration with Platform
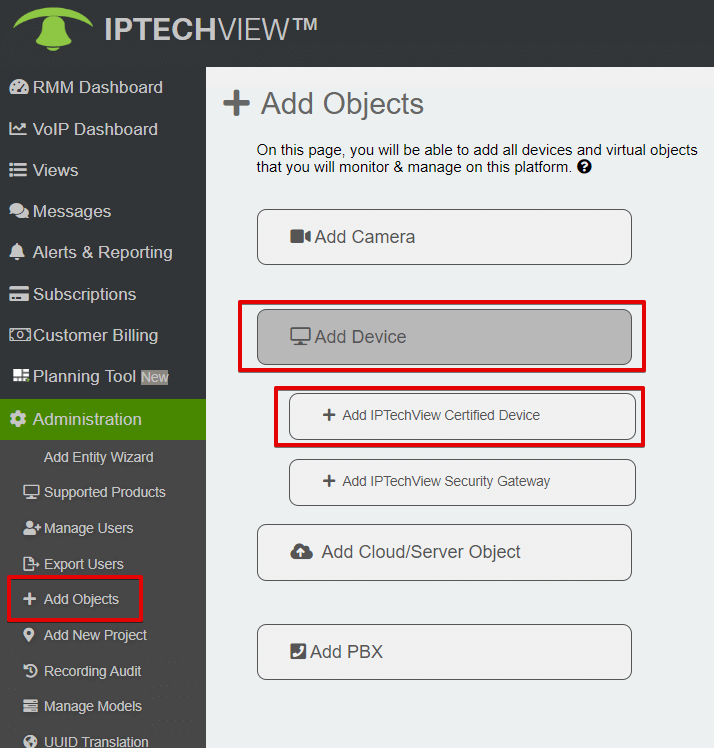
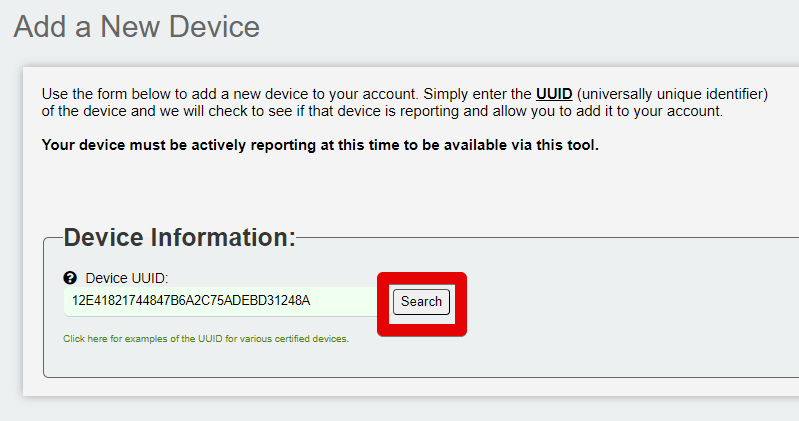
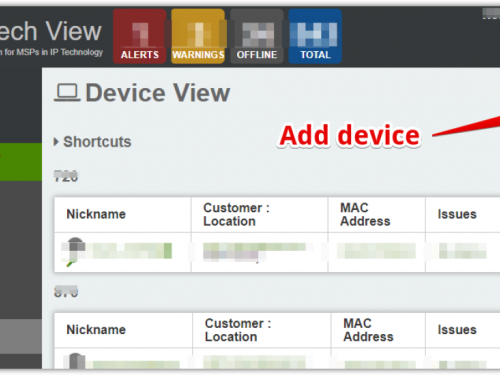
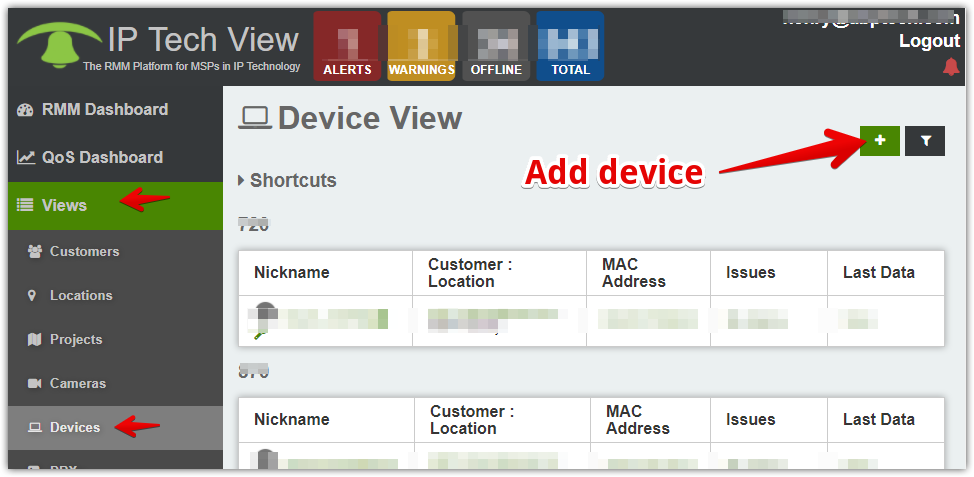
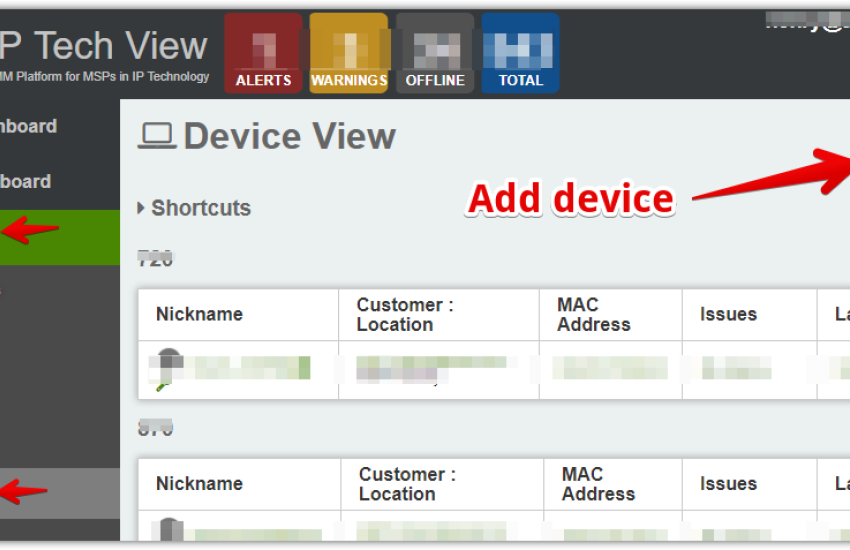
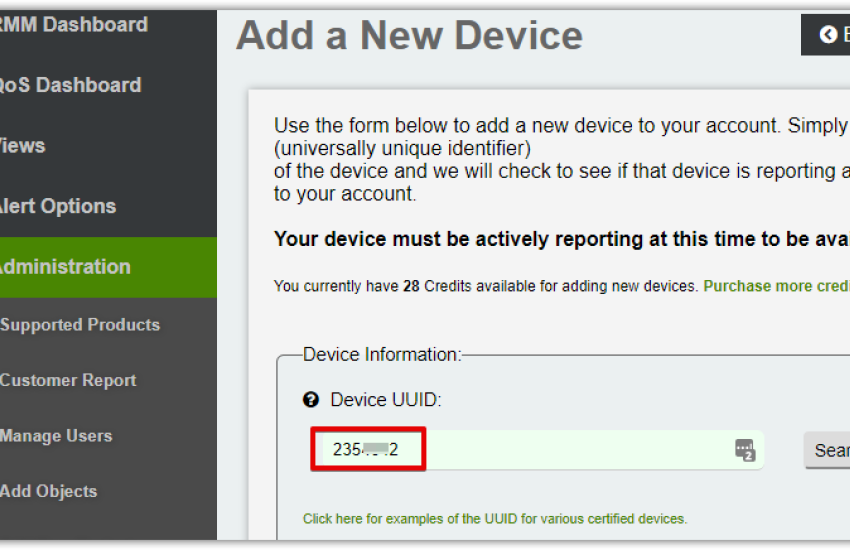
The device must be registered with IPTECHVIEW. If it is already, skip this section. To register the device go to Add device and enter the unique device ID you can find it under Device Status when accessing the device locally.
Note: It could take a couple minutes after adding the device to become online.
Adding cameras to IPT-CAMVIEWER-ONE
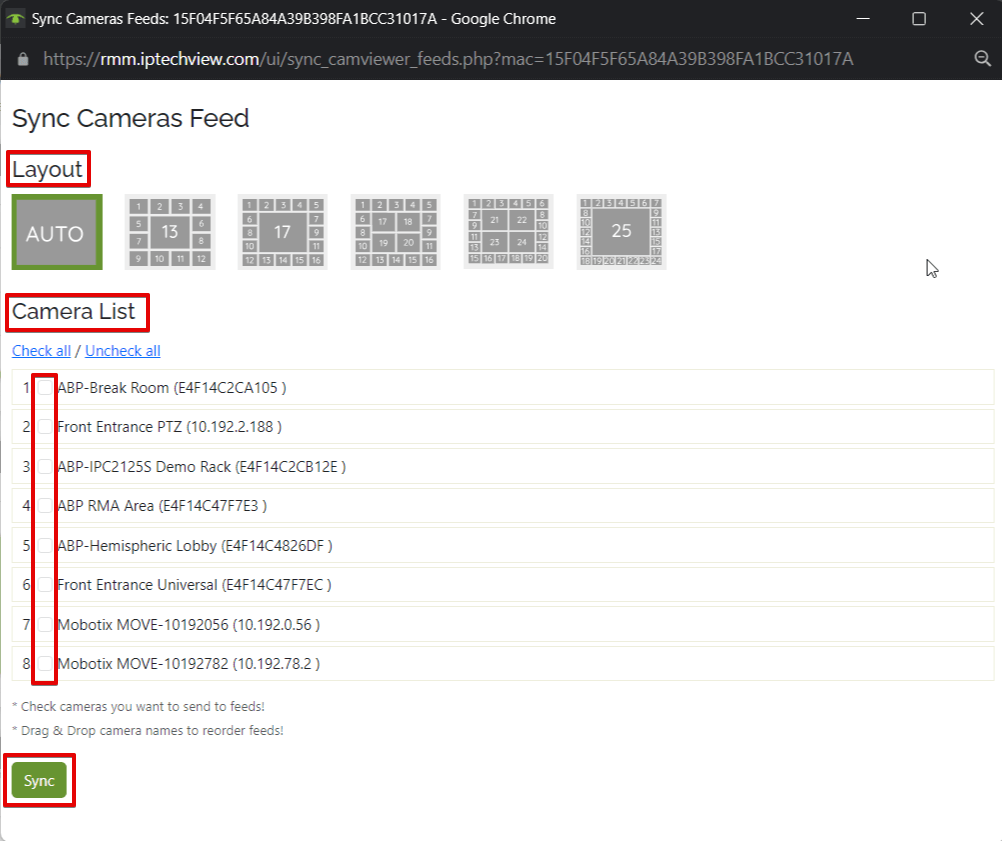
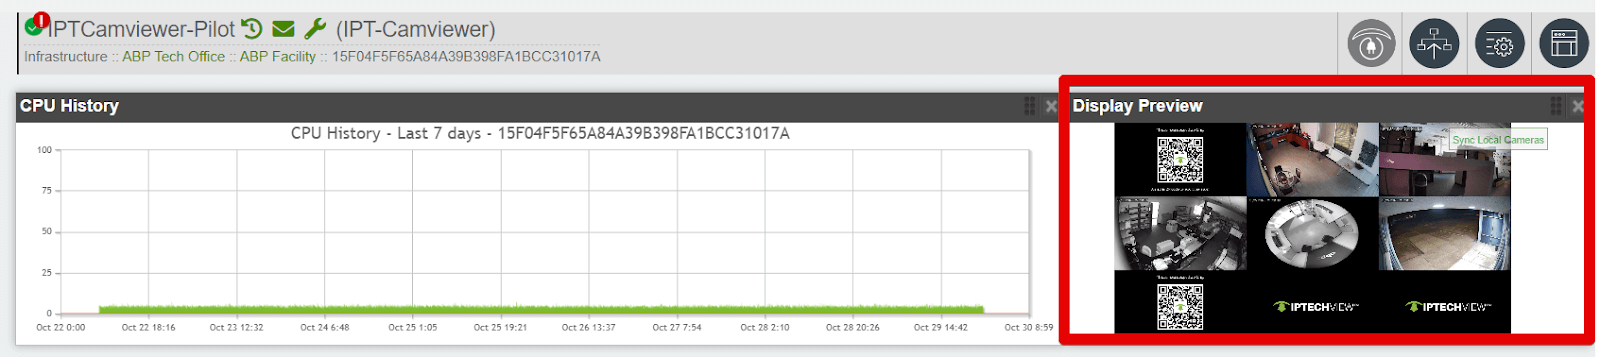
1. Please locate the IPTCamviewer on IPTECHVIEW. Next click on Sync Local Cameras button located on Display Preview widget.
2. Select layout grid, choosing Auto will automatically adjust to however many cameras you have under qty 24.
3. Select cameras from Camera List, then click sync.
Please allow 3-6 minutes and you will be able to see the streams under the Display Preview widget on IPTECHVIEW.
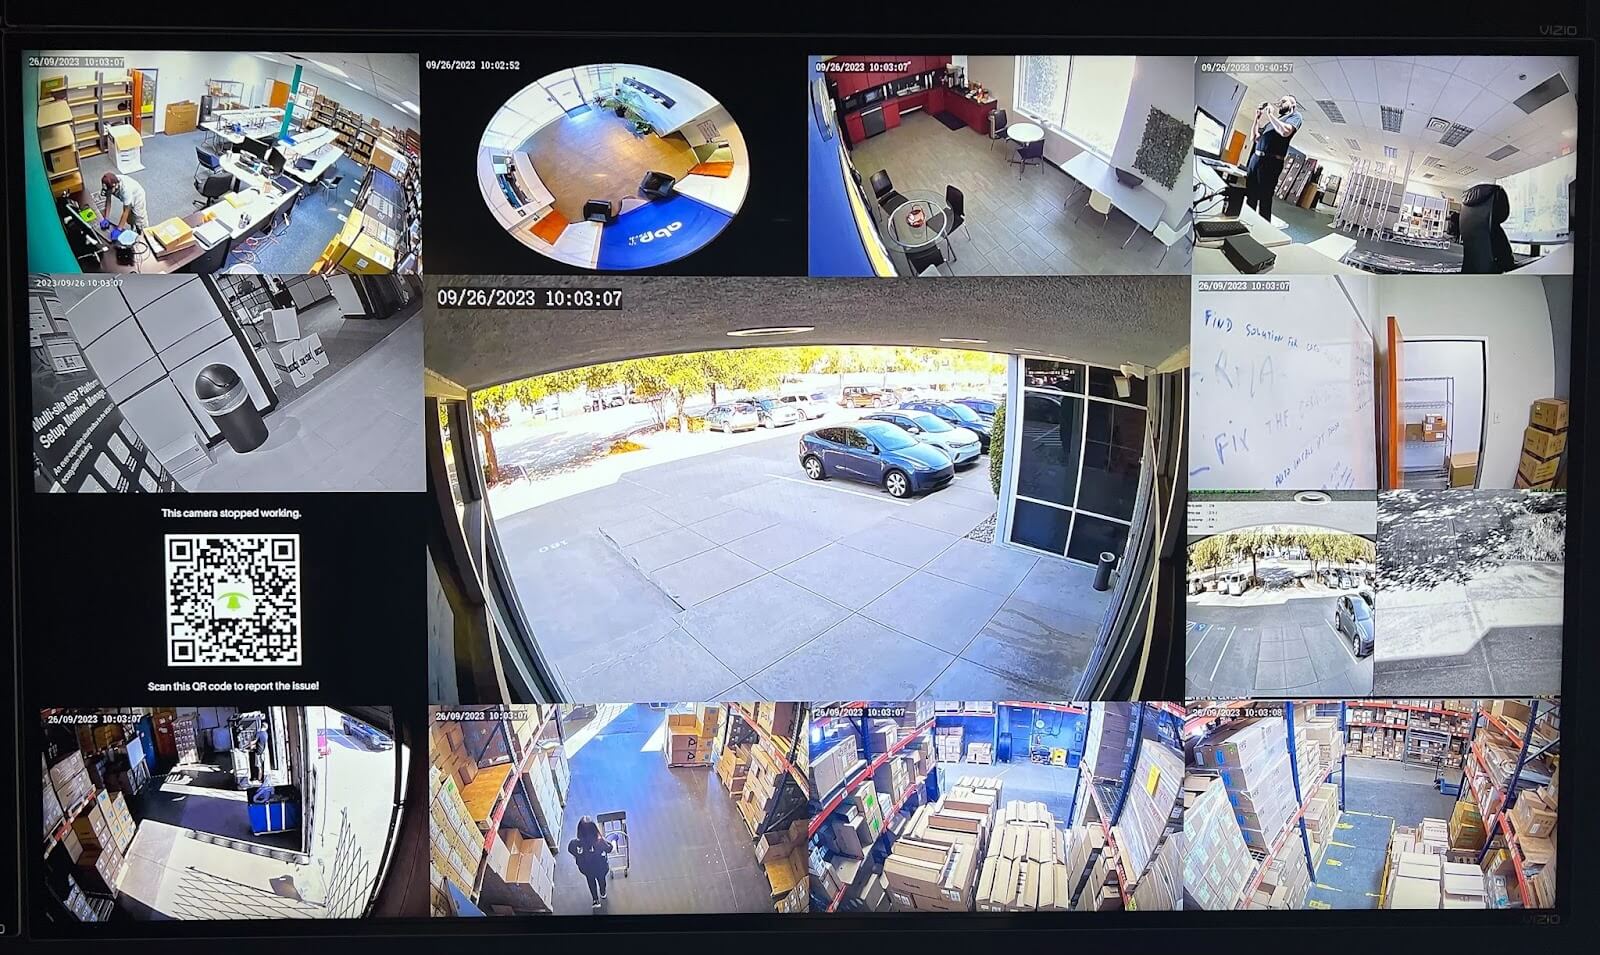
Viewing cameras to TV monitor/screen
Please have the user select the HDMI input connected to IPT-CAMVIEWER-ONE on the TV monitor to view camera streams.
Detecting & Managing Devices with the ABP IPSecGate using the IPTECHVIEW Platform
Detecting & Managing Devices with the ABP IPSecGate using the IPTECHVIEW Platform
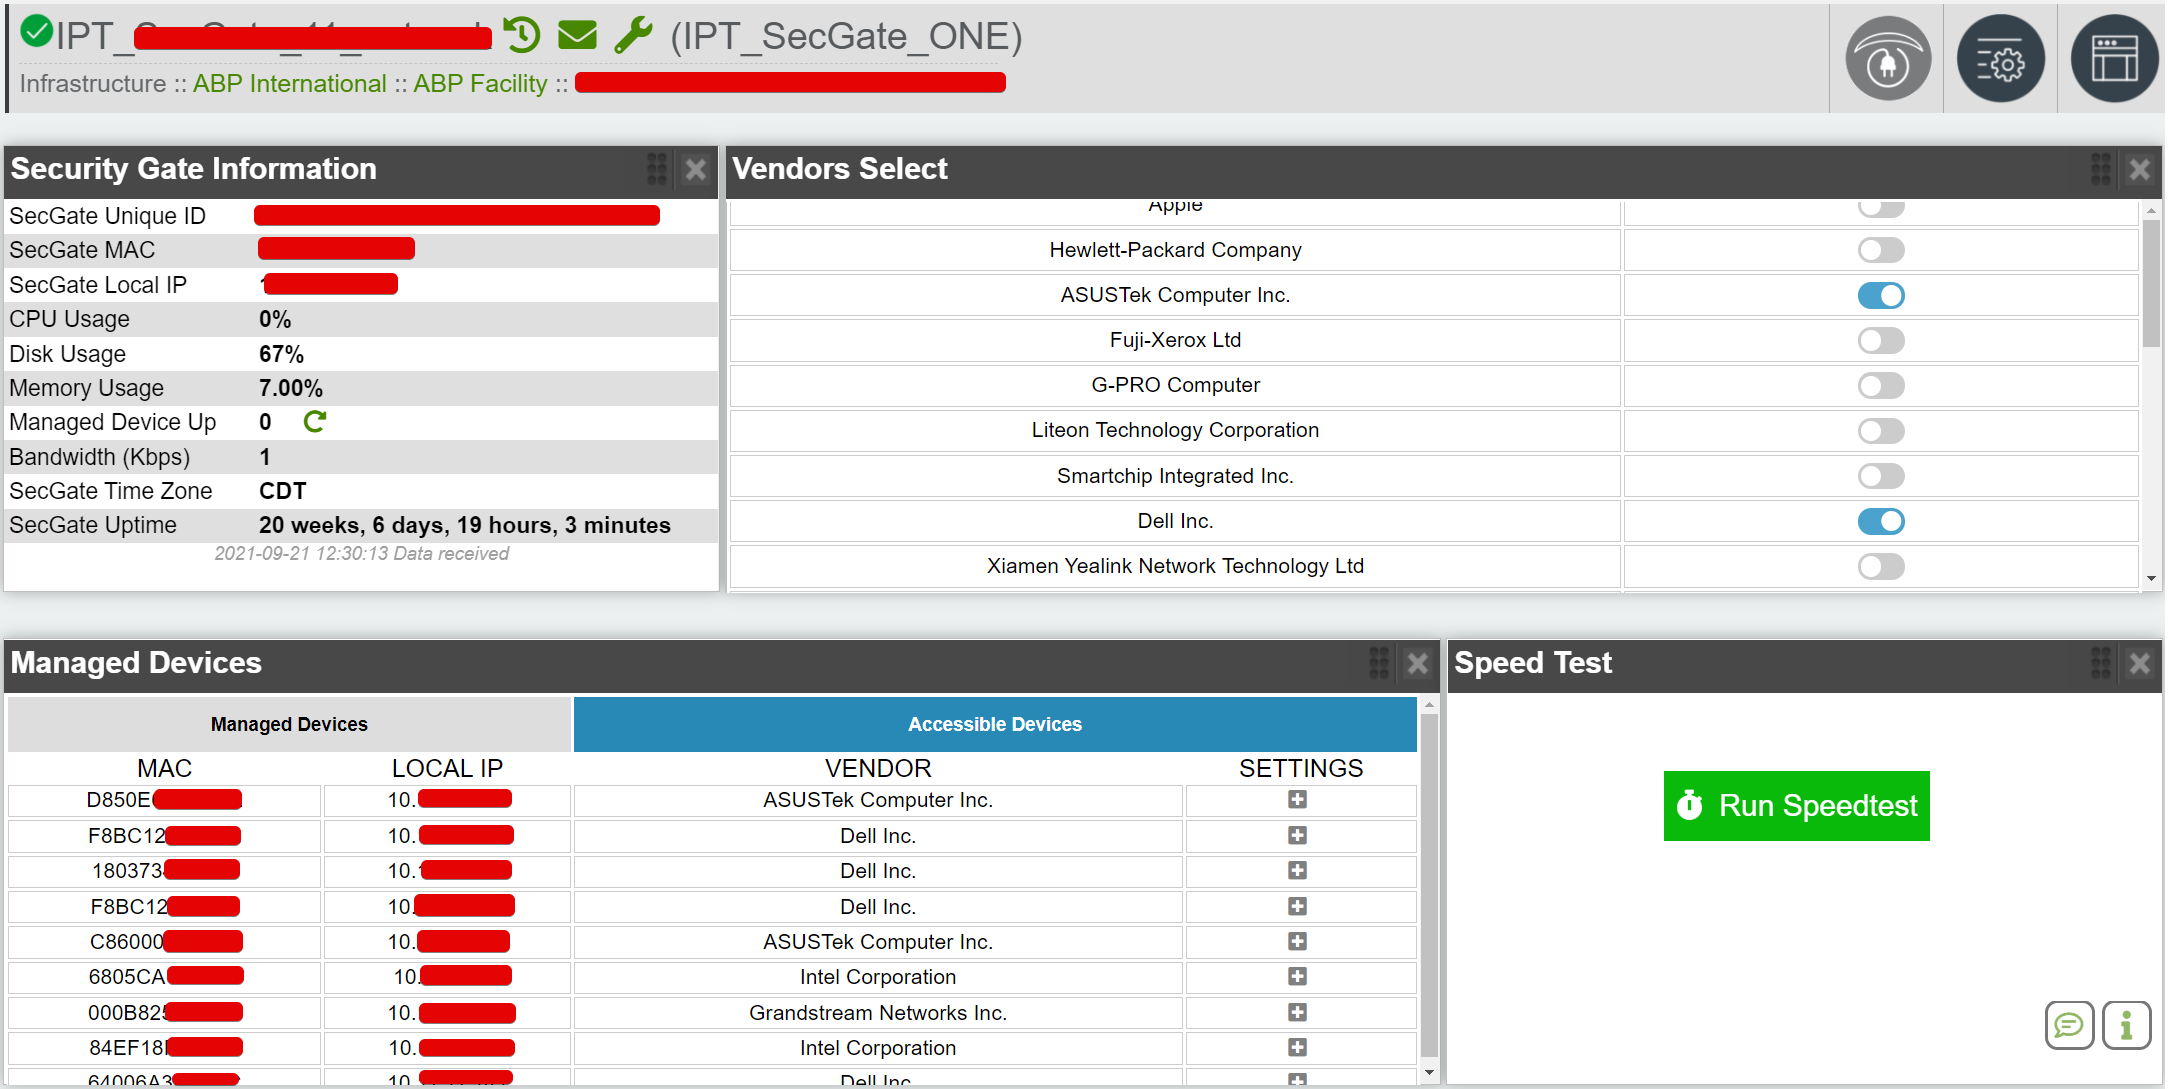
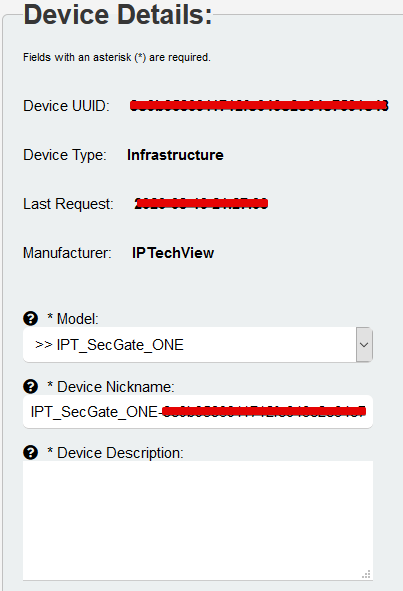
1. Once the IPSecGate device has been added onto the IPTECHVIEW platform, view the entry created in the system.
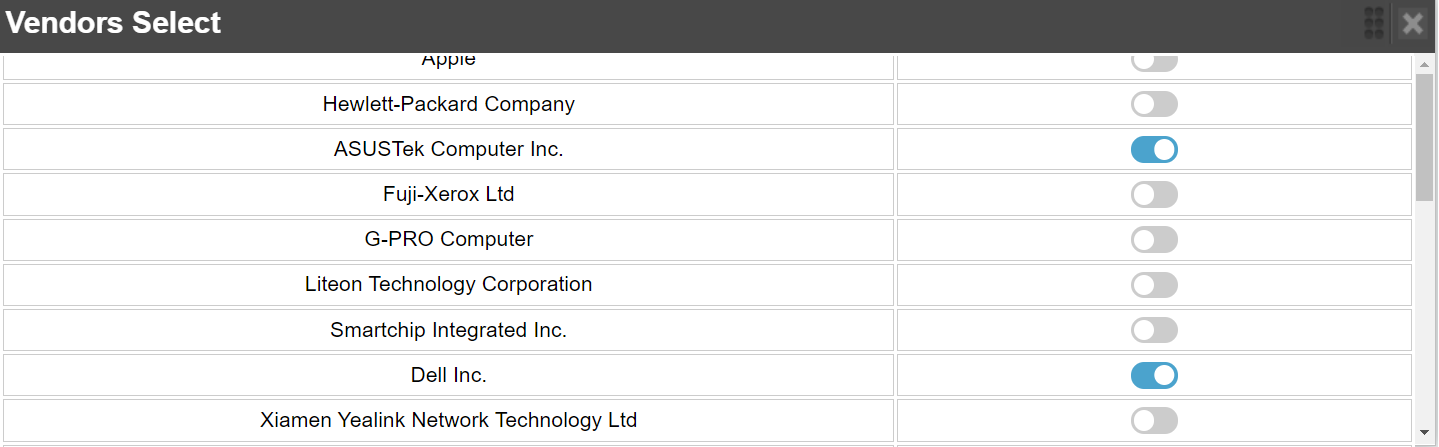
2. You will use the Vendors Select screen to display what vendors will be shown under the Accessible Devices below.
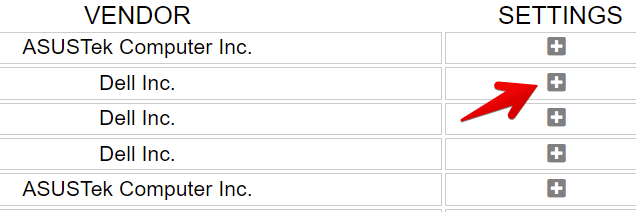
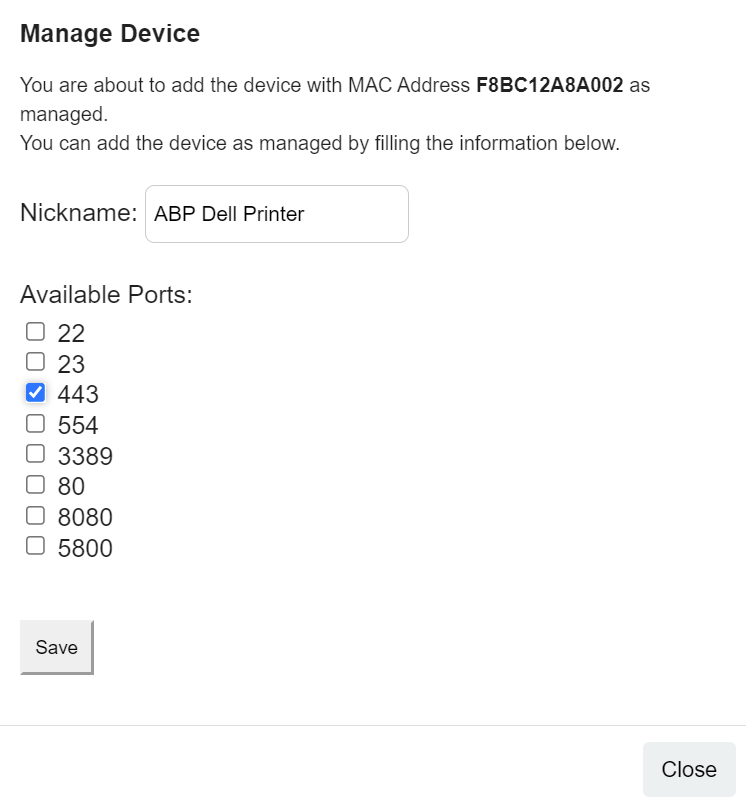
3. To manage a device, click on the settings + icon and set the Nickname as well as the desired port the device will be accessed from.
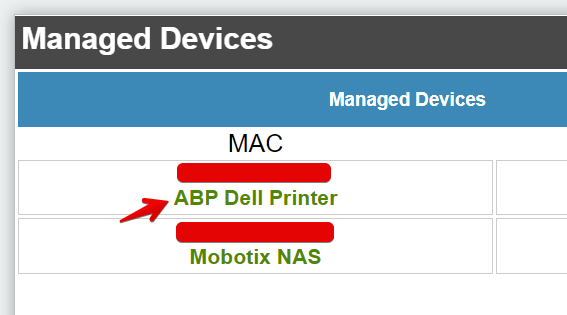
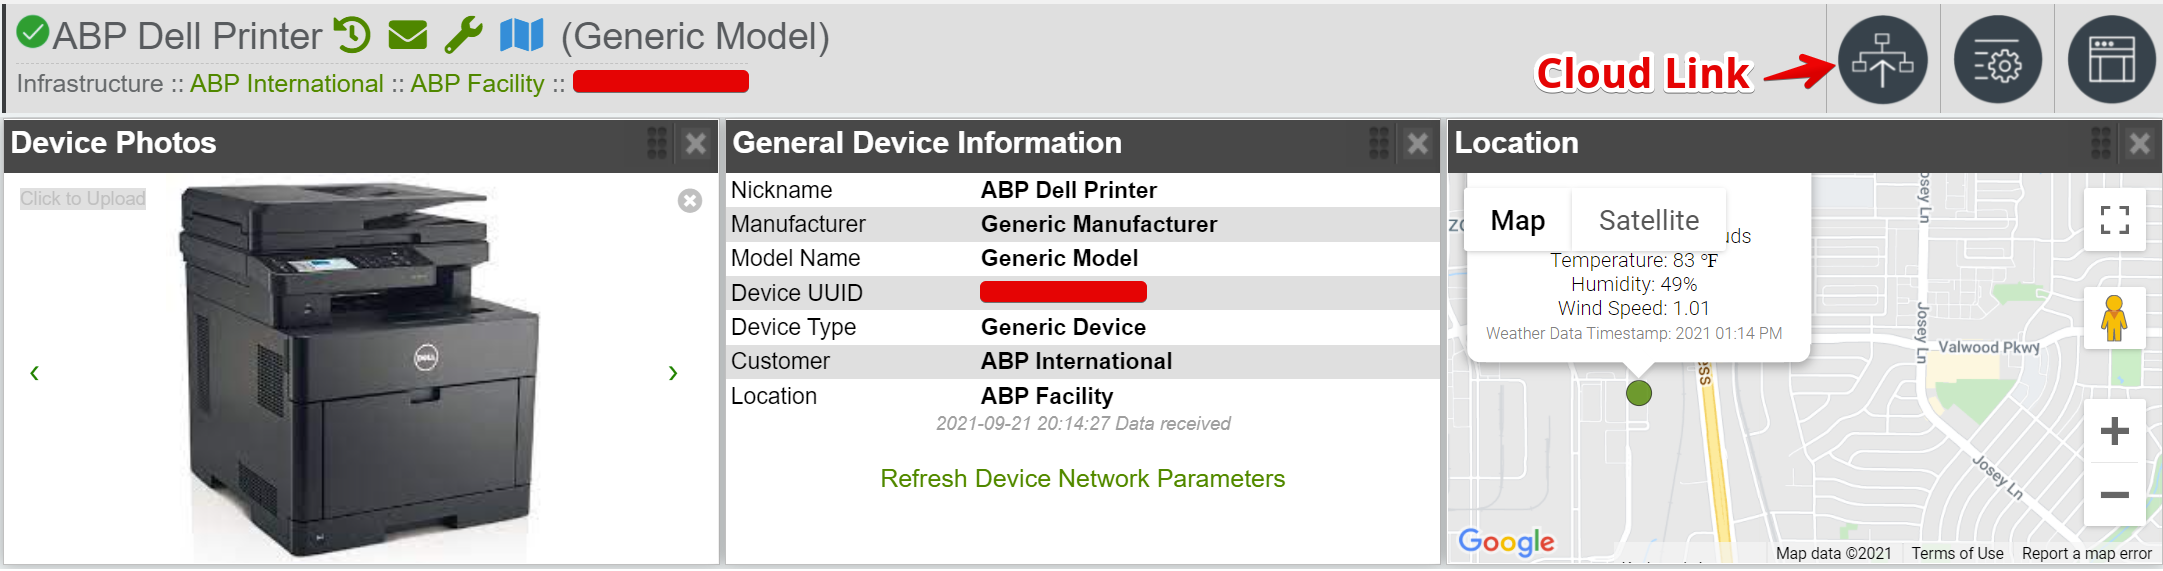
This will add the device to the Managed Devices tab, and will create an entry on the IPTECHVIEW with the device which can be accessed by clicking the link. Note: It can take up to 5 minutes to generate a cloud link for the newly added device.
How To Provision the Draytek Vigor2927 Series To Connect To IPTechView
Draytek 2927 Series on IPTechView
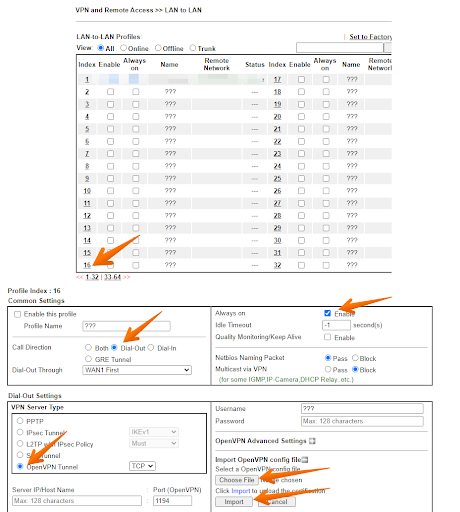
1. Connect Router WAN to network; Connect PC to LAN and open 192.168.1.1 login with admin / admin 2. Update firmware to using this Firmware 3. VPN and Remote Access >> LAN to LAN>> 16 Use one of the two files below: OpenVPN File to load By default: IPT_tunnel_us_east_1_TCP.ovpn OpenVPN File to load only IF customer is in WEST Region: IPT_tunnel_us_west_1_TCP.ovpn
After Saving Validate VPN profile Always on setting is enabled
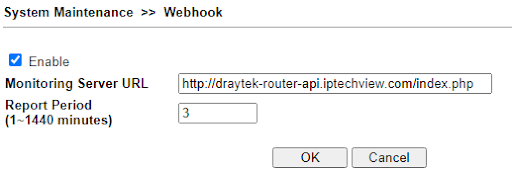
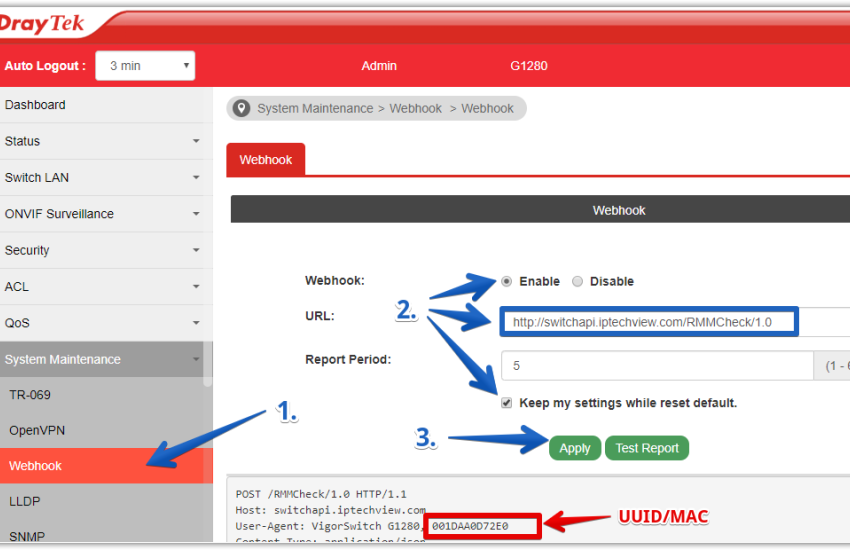
4. Go to System Maintenance >> Webhook Server URL: http://draytek-router-api.iptechview.com/index.php Period: 3
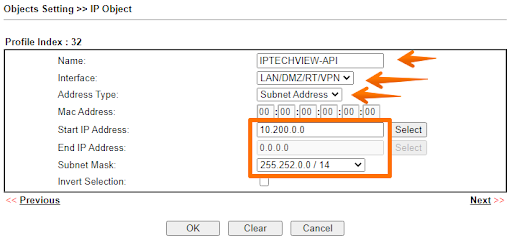
4.1 Objects Setting >> IP Object Click on Profile 32
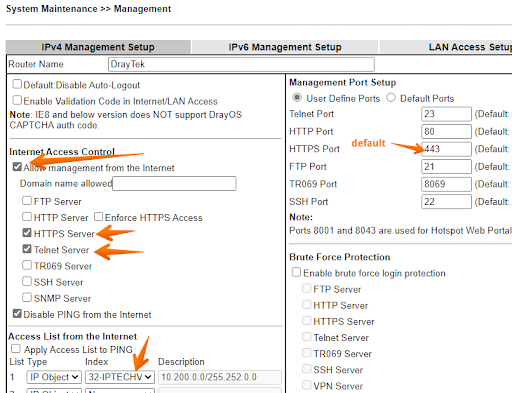
4.2 System Maintenance >> Management
Save & reboot
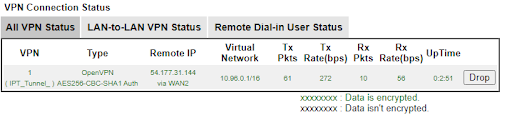
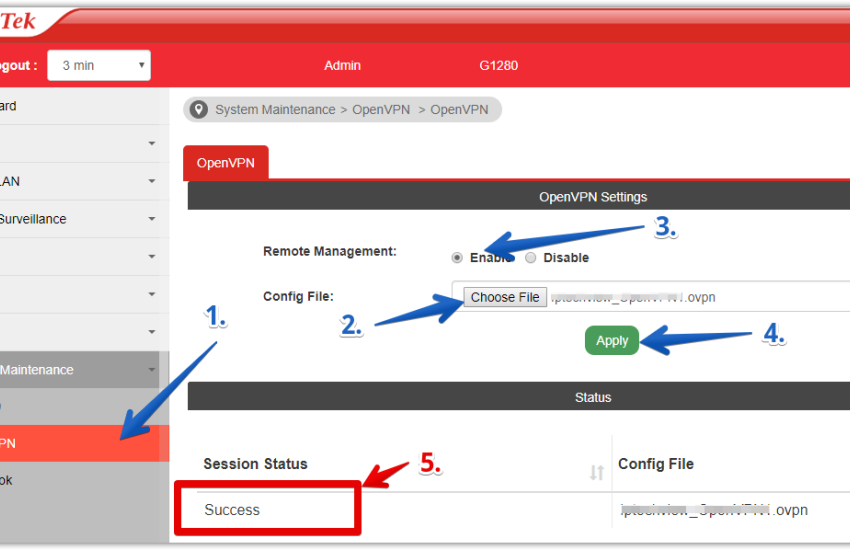
5. Verify OpenVPN connected under VPN and Remote Access >> Connection Management
You will have to enter the device’s UUID which is the MAC address.
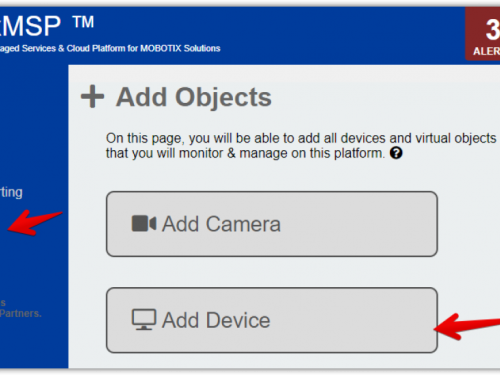
How do I add the IPT-LTEGate-POE to the platform
IPT-LTEGate-POE is a pre-configured IPTECHVIEW ready device. In order to add the device to the platform follow these simple steps
Connect the IPT-LTEGate-POE to the network (must have internet)
Let the device sit for 5 minutes to allow it to report to the cloud
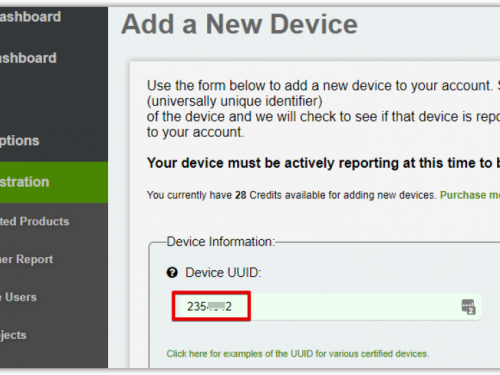
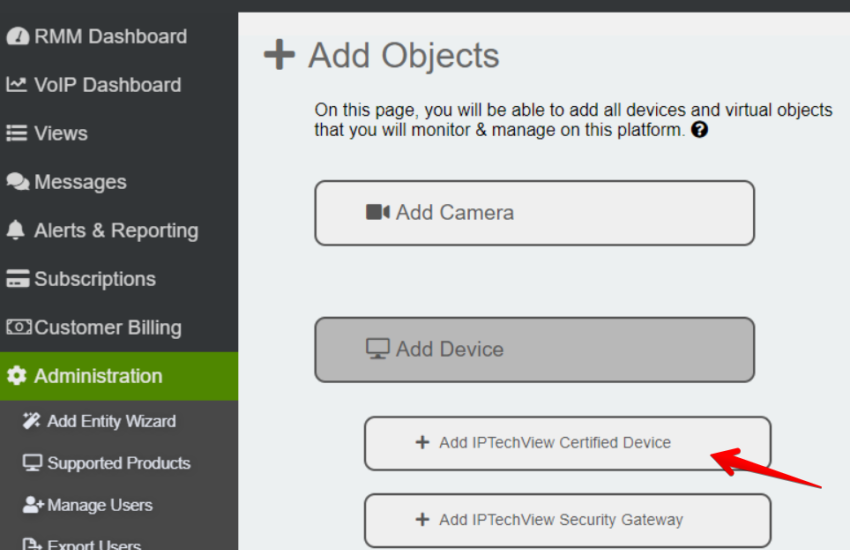
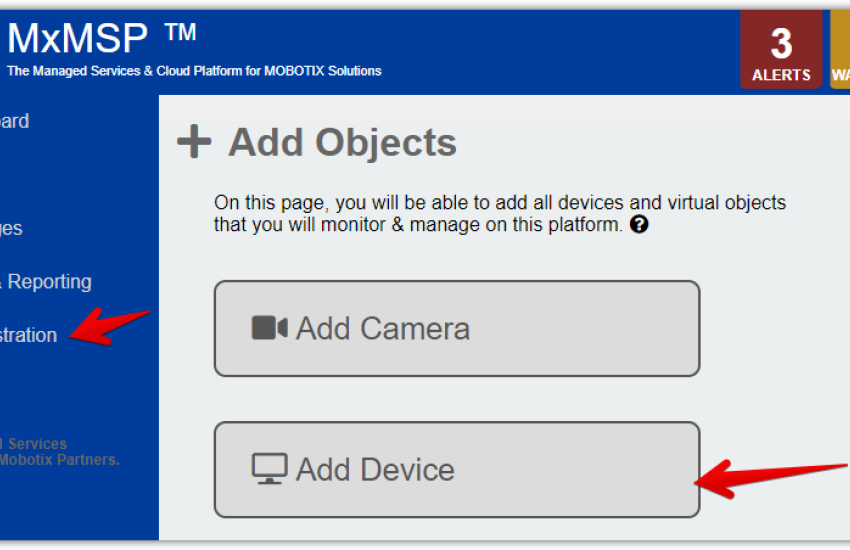
Navigate to the “Add IPTechView Certified Device” on the IPTechView
Search for the device using the UUID (the MAC)
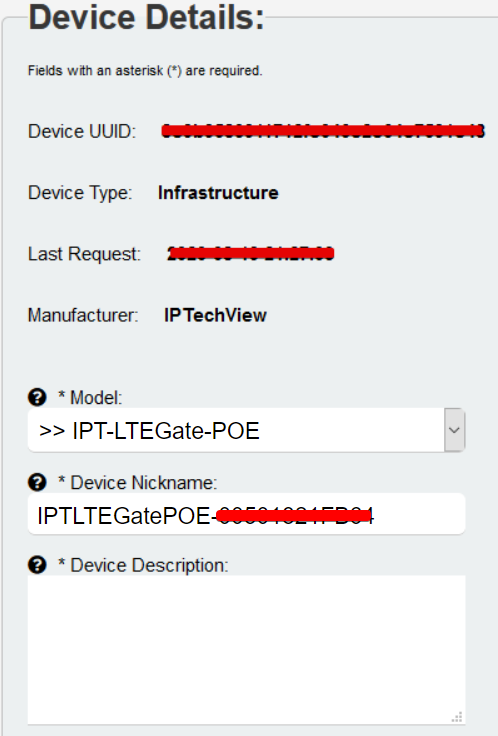
Assign the IPTLTEGate to a profile & customize the entry into IPTechView
IPT-LTEGate-POE is a pre-configured IPTECHVIEW ready device. In order to add the device to the platform follow these simple steps
Adding & Managing Users on the IPTechView
When using IPTechView, giving partners access to the platform while setting the roles and permissions are important to control what they have access to. This is done through creating new users.
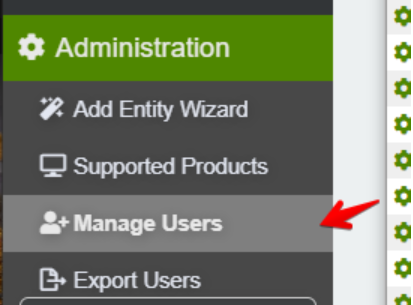
This can be added on the Administration->Manage Users section.
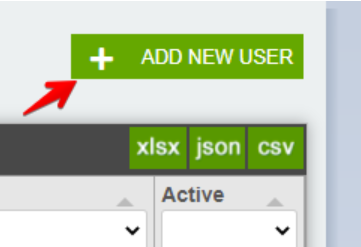
To add a new user, click the ADD NEW USER button.
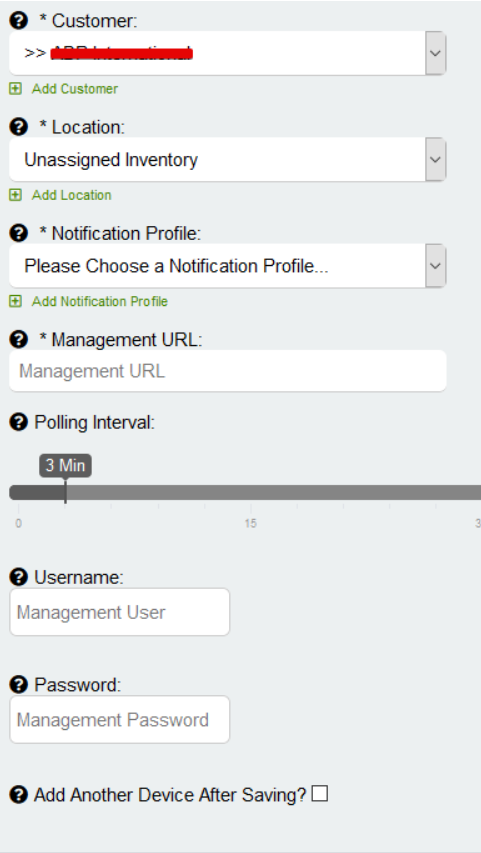
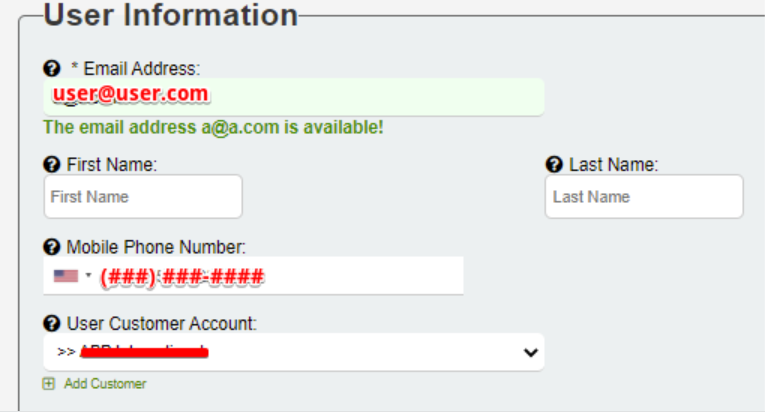
First, the User Information will have to be set. Like the Email Address, Name, Phone Number and the Customer that the user will belong to.
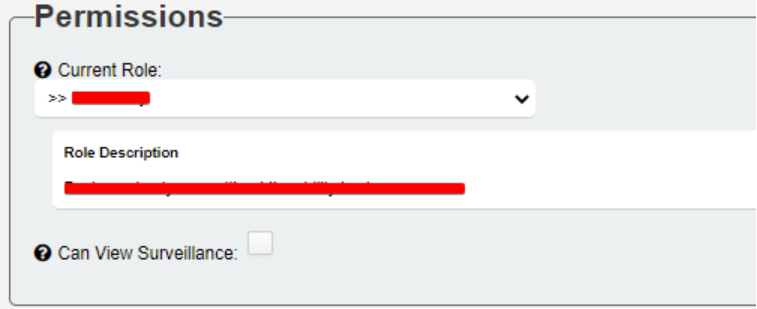
Next, the Permissions for the role will need to be set for the account. You can select the following: Partner Admin – Top level customers for the most part underneath company running version of the platform. This user will show as the administrative contact on their View Customer page.
Partner Technician – Can view surveillance but is unable to add/edit. This user will show as the technical contact on their View Customer page.
Read Only – Basic read only user without the ability to view cameras.
MxLINQ Master – User will only have access to the end user site MxLINQ. Master role allows administration.MxLINQ Basic – User will only have access to the end user site MxLINQ. Basic role is read only.
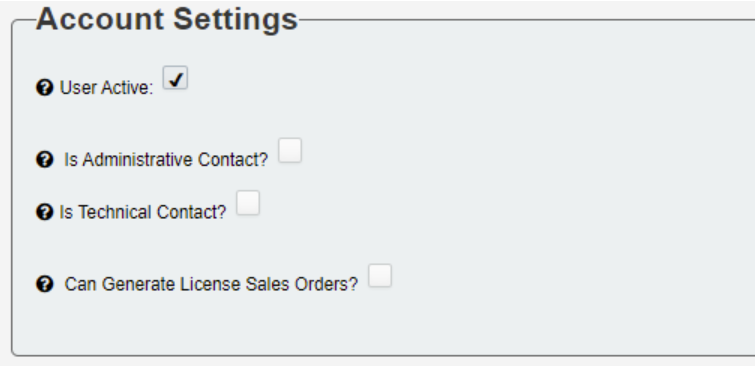
Then, you will set the if the User is Active, is the main Administrative contact for the company or a Technical Contact. Also, if the User has the ability to Generate License Sales Orders.
Finally, click the Add New User button to add the user.
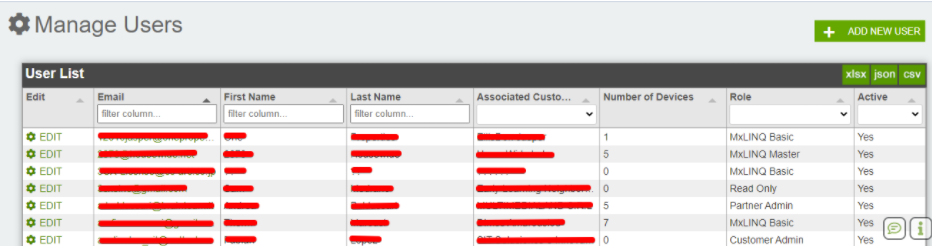
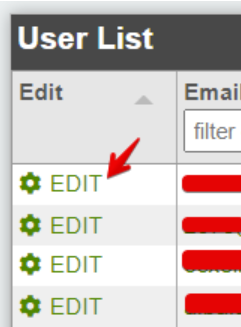
Once the user has been created, you can manage them by navigating to the side panel to Administration->Manage Users. From here you will be able to search for the existing users by Email, First Name, Last Name, Associated Customer, Number of Devices, Role and finally if the Role user is Active.
Click EDIT to manage the user.
How do I add a Mobotix Camera to MXMSP or IPTechView?
Ideally your camera has been provisioned to connect to MXMSP or IPTechview platform by your distributor. If that is not the case or you have an existing camera there is few simple steps to follow detailed in this FAQ
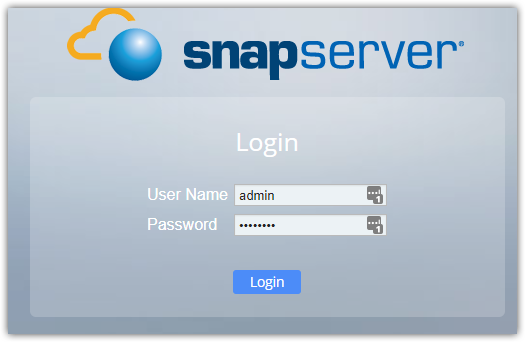
Step 1: Login
[Missing Picture]
Step 2: Add camera
Step 3: Enter Serial number
Step 4: If device is provisioned and online the system will let you configure few extra settings before adding them
How to provision an Overland NAS to connect to the platform?
Ideally you purchased your Overland with the MX-MSP Ready Seal. If you did, your Overland NAS is already provisioned to connect to MXMSP. In that case you can skip to the section “Add an Overland NAS to your account in IPTechview” below.
Three Steps to provision the Overland NAS to connect to MXMSP or IPTechView.
Step 1:
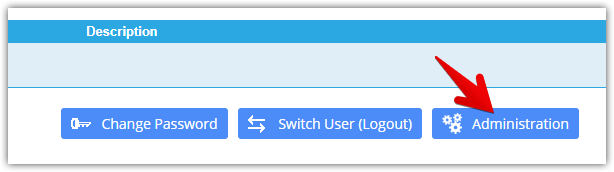
In a Browser Open the device GUI, click on Adminitration and Login. Default credentials are admin / admin
Step 2:
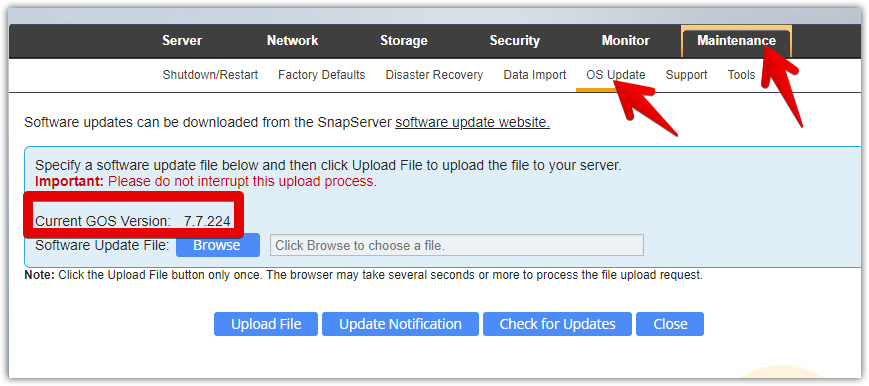
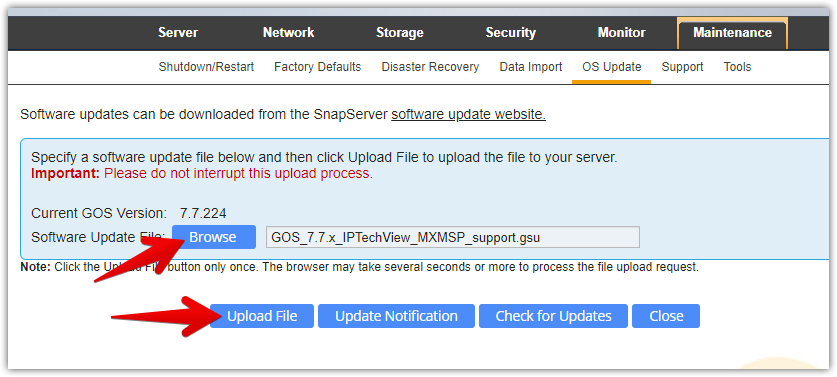
Navigate to the Maintenance – OS Update page. Your Current GOS Version must be 7.7.224
If your current GOS version is NOT 7.7.224 update to 7.7.224 first. Follow same instructions shown in Step 3 but using this file: GuardianOSImage_7.7.224.gsu
Step 3:
Download GOS_7.7.x_IPTechView_MXMSP_support.gsu file to your computer. Click on Browse, select the file and click on Upload File. Please be patient. It might take up to 10 minutes for the NAS to load the new file and reboot.
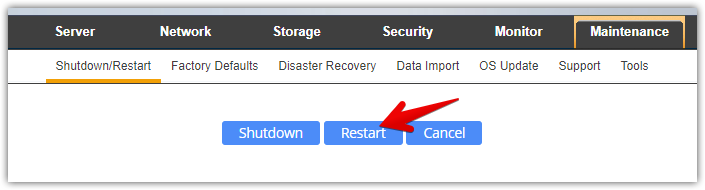
Step 4:
Reboot the Server. Navigate to Maintenance – Shutdown/Restart
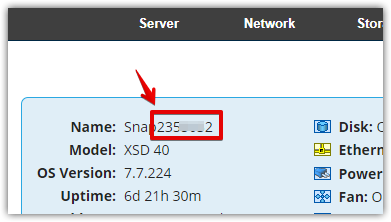
For the Overland SnapServer the UUID is the server name printed in the bottom of the device or in the SnapServer GUI’s Admin home screen.
Use the numeric 7 digits. If you changed the Server Name you need to find the 7 digits server number from the label at the bottom of the device.
Click on Search. The system should find your device. Follow screen prompts to add additional information about the device.
How do I provision my Mobotix Cameras to connect to the platform?
Ideally your camera has been provisioned to connect to MXMSP or IPTechview platform by your distributor.
If that is not the case or you have an existing camera there is few simple steps to follow. We have provided a provisioning tool in the portal you can download and run in any computer that has access to the camera GUI.
Step 1: Download the provisioning tool from your MXMSP Portal
Step 2: Execute the file. Depending on your machine security settings, a security warning might pop up. You need to accept and let the application run. The mx_msp application is secure has been digitally signed. You can verify that by looking at the file properties – Digital Signatures. Picture It might take a couple seconds for the provisioning tool to run.
Step 3: Enter the camera IP, Username and Password and Click on the Blue Button to provision the camera. Note : It your camera’s GUI uses a port different than 80 or you have access thru a different port forwarded to the camera include the port in the address field in the following format IP:port i.e. 123.145.23.12:8080 Picture It might take up to 10 seconds for the camera to be provisioned
Step 4: Verify that the operation was successful. You are done. Now you can go to your MXMSP portal to add the camera. Instructions for that are provided in this FAQ
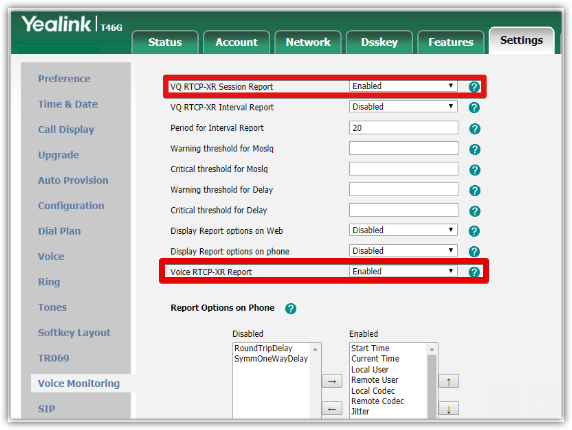
How do I configure my Yealink phone for VoIP QoS monitoring
First make sure the version of your phone is x.80.x.x or later.
You can do it manually using the phone GUI (see below) or you can add to the PBX provisioning template so the parameters can be provisioned automatically from the server.
Here are the settings to use if provisioning the phone from the PBX or provisioning server:
In the text above your provisioning server or PBX needs to replace %%mac_address%% with phone’s MAC. Check with your provisioning server to see what variable you can use. If you use an SBC as outbound proxy make sure to add the sip.third_part_request.use_outbound.enable = 0 setting.
If you use an SBC as outbound proxy make sure to add the sip.third_part_request.use_outbound.enable = 0 setting using the import CFG configuration option under Settings.
3. Save and reboot the phone
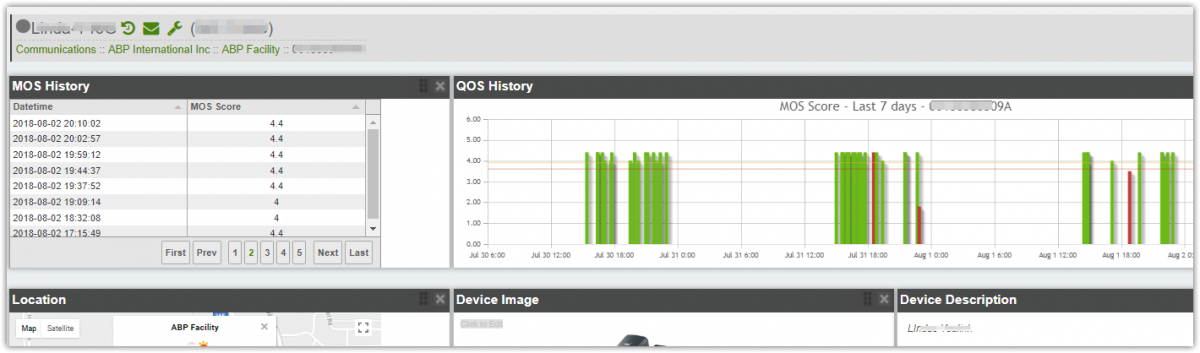
Once this is configured place a call and your phone should report the Voice Call Quality value to our servers.
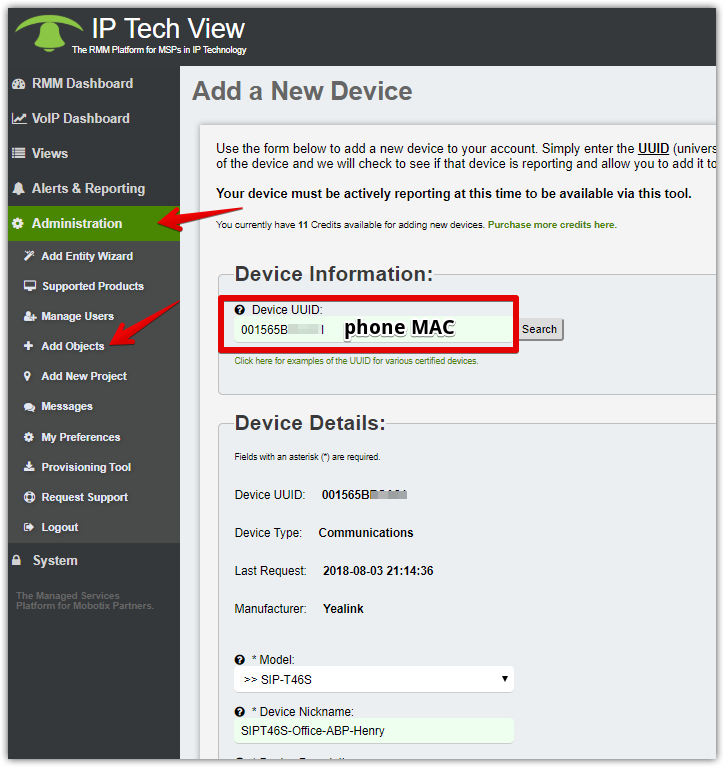
Soon after that you add the phone MAC Address to IPtechview
The phone now can be found in the VoIP Dashboard where you can see all the VoIP QoS MOS score for each new call.
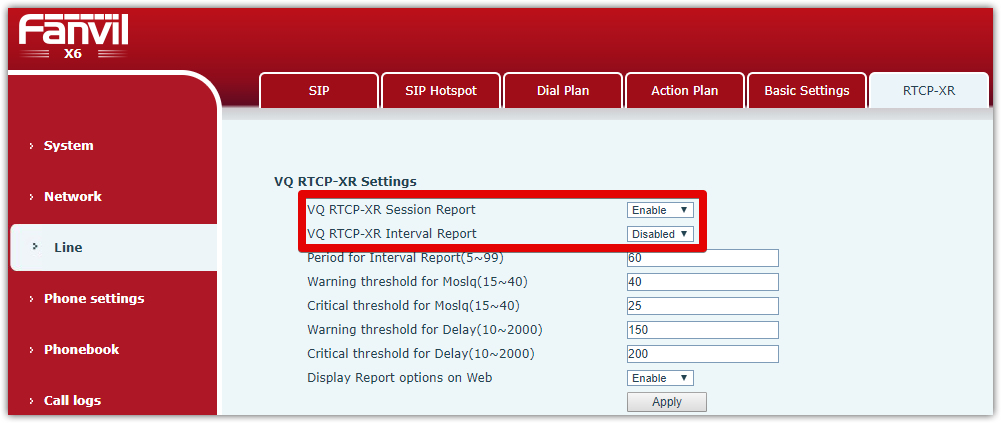
How do I configure my Fanvil phone for VoIP QoS monitoring
First make sure the firmware version in your Fanvil phone is current. Older but not too old versions should work too.
You can do it manually using the phone GUI (see below) or you can add to the PBX provisioning template so the parameters can be provisioned automatically from the server.
Here are the settings to use if provisioning the phone from the PBX or provisioning server:
In the text above your provisioning server or PBX needs to replace %%mac_address%% with phone’s MAC. Check with your provisioning server to see what variable you can use.
A custom 3CX provisioning template can be found below:
1. Under Line – RTCP-XR enable VQ RTCP-XR Session Report and disable VQ RTCP-XR Interval Report
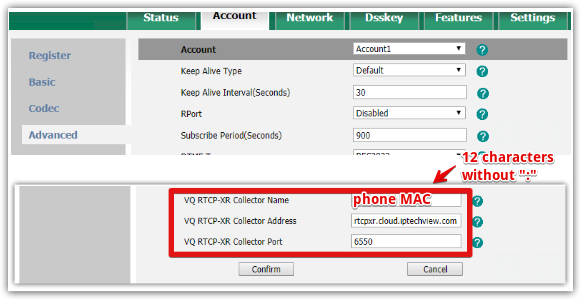
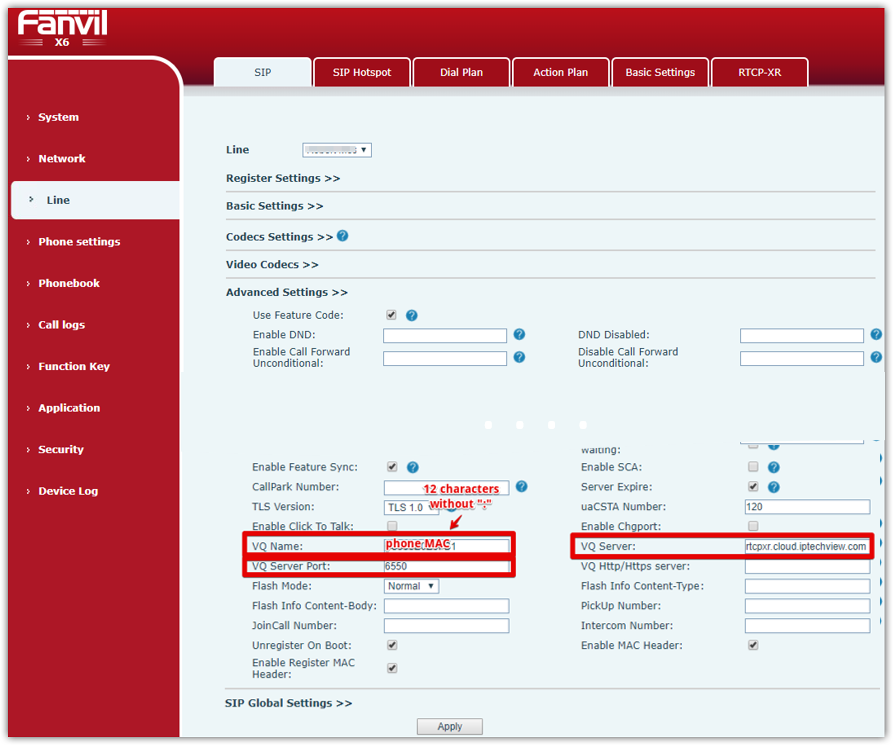
2. Under Account – Advanced configure the three VQ settings as shown below:
VQ Name = The phone MAC (12 characters with out “:”. i.e. 0C383EBF1234)
VQ Server = rtcpxr.cloud.iptechview.com
VQ Server Port = 6550
3. Apply configuration and reboot the phone
Once this is configured place a call and your phone should report the Voice Call Quality value to our servers.
After the first call has ended you can add the phone MAC Address to IPtechview
The phone now can be found in the VoIP Dashboard where you can see all the VoIP QoS MOS score for each new call.
How do I configure my Snom phone for VoIP QoS monitoring
You can do it manually using the phone GUI (see below) or you can add to the PBX provisioning template so the parameters can be provisioned automatically from the server.
Here are the settings to use if provisioning the phone from the PBX or provisioning server:
In the text above your provisioning server or PBX needs to replace %%mac_address%% with phone’s MAC. Check with your provisioning server to see what variable you can use.
Here is how you manually configure through phone GUI
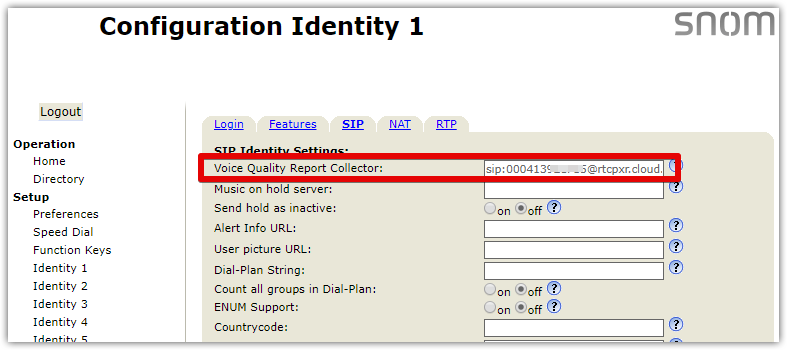
1. Under Identity 1 – SIP
Voice Quality Report Collector = sip:<phone MAC>@rtcpxr.cloud.iptechview.com:6550 The phone MAC (12 characters with out “:”)
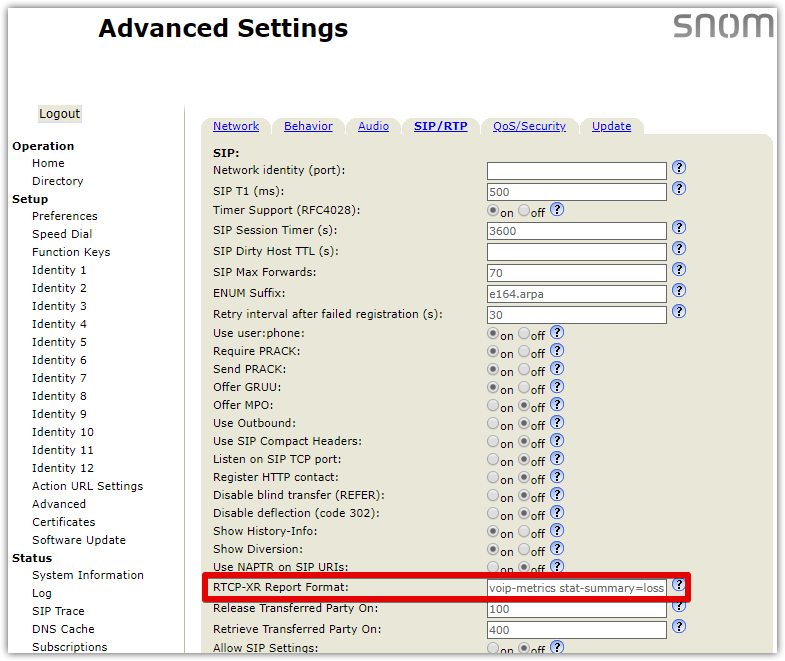
RTCP-XR Report Format = voip-metrics stat-summary=loss,dup,jitt
Click Apply at the bottom of the page.
3. Save and reboot the phone.
Once this is configured, place a call and your phone should report the Voice Call Quality value to our servers.
Soon after that you can add the phone MAC Address to IPtechview.
The phone now can be found in the VoIP Dashboard where you can see all the VoIP QoS MOS score for each new call.
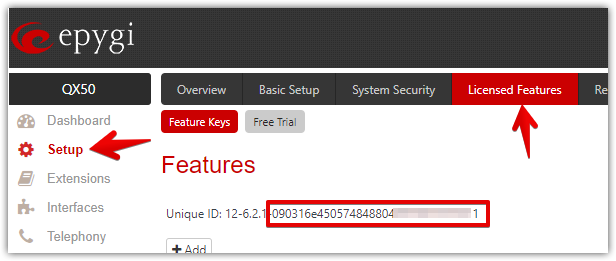
How to provision an Epygi PBX to connect to the platform?
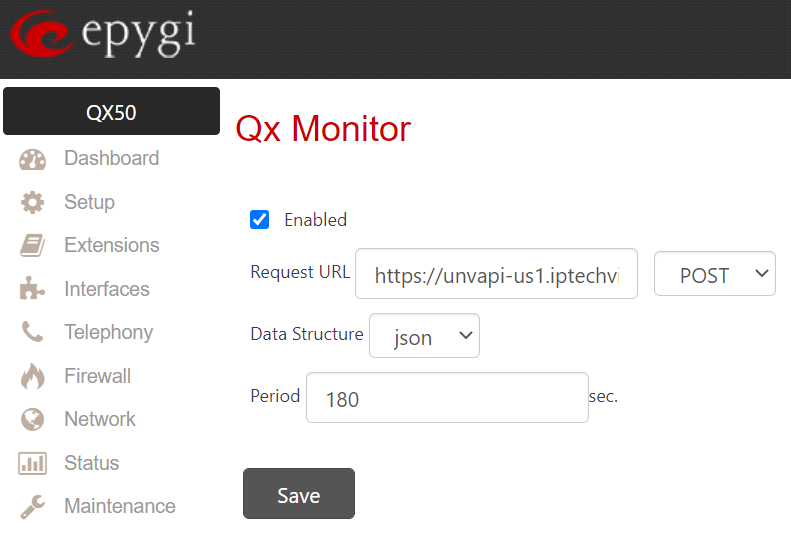
In a Browser Open the Epygi GUI. Once logged in, go to /qxmon page and program as shown. i.e., https://[YOUR_EPYGI_IP]/qxmon
Set Request URL: https://unvapi-us1.iptechview.com/RMMCheck/1.0 POST
Data Structure: json ; Period: 180
Then save.
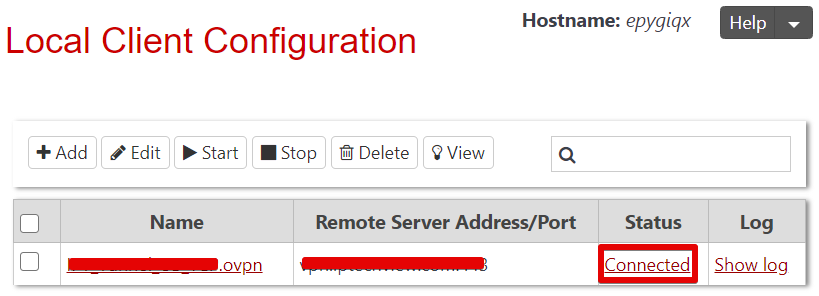
Next, you will need to upload the OpenVPN file which you can get from Support into the Epygi GUI (Network->OpenVPN->Local Client Configuration). You can do this by clicking Add and browse file.
Once it is uploaded check the box next to the file name and click Start. The status will show ‘Connected’ when it is correctly working.
Reboot. Wait at least 5 minutes until the Epygi is up to continue with next step
For Epygi, the UUID is the last 32 characters of the device’s Unique IP. You can find the Unique ID string in Epygi GUI by navigating to Setup > Licensed Features screen
Click on Search. The system should find your device. Follow screen prompts to add additional information about the device.
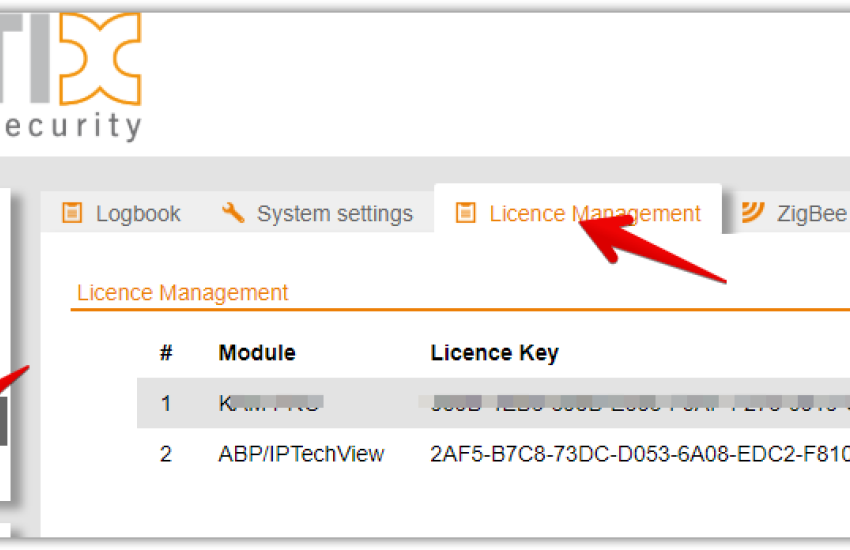
How to provision a Kentix Alarm Manager to connect to the platform
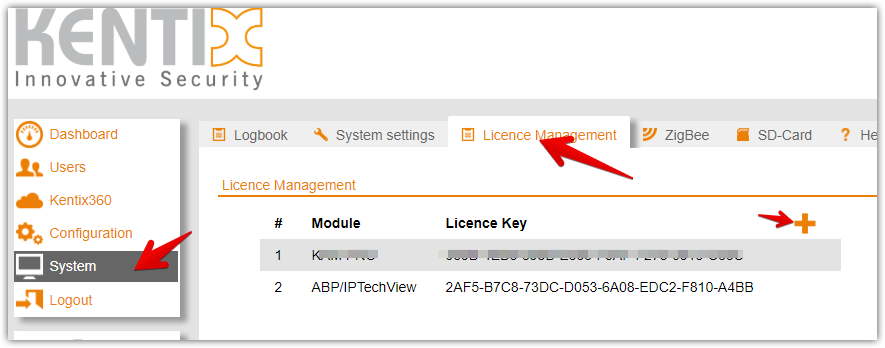
In a Browser Open the Kentix Alarm Manager (KAM) GUI. Once logged in, navigate to System > License Management
Click on + button and Add the following license key: 2AF5-B7C8-73DC-D053-6A08-EDC2-F810-A4BB
Wait a few minutes to continue with the next step.
You will have to enter the device’s UUID which is the MAC address.
You can find the Unique ID (MAC) in the label of the unit or string found in Webhook page of the switch.
Click on Search. The system should find your device. Follow screen prompts to add additional information about the device.
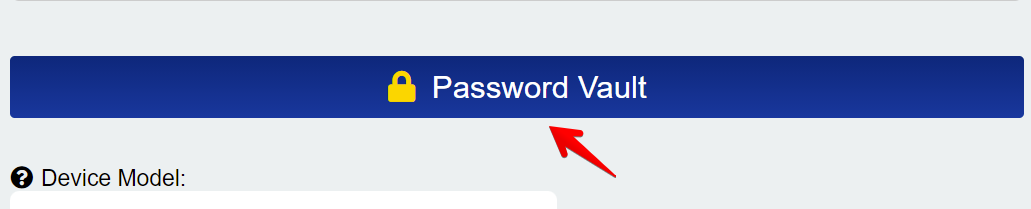
Please make sure that the Password Vault matches the login credentials of the switch or information will be missing on the page and it will display a “FIRMWARE UPDATE REQUIRED” message.
Click on the edit device button at the top right hand corner of the page.
Click on the Password Vault.
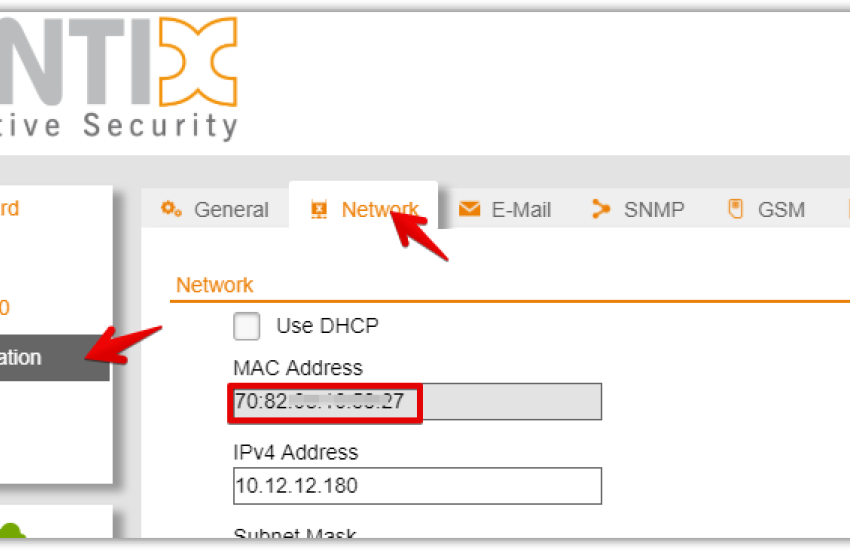
How to provision a Kentix Multisensor to connect to the platform
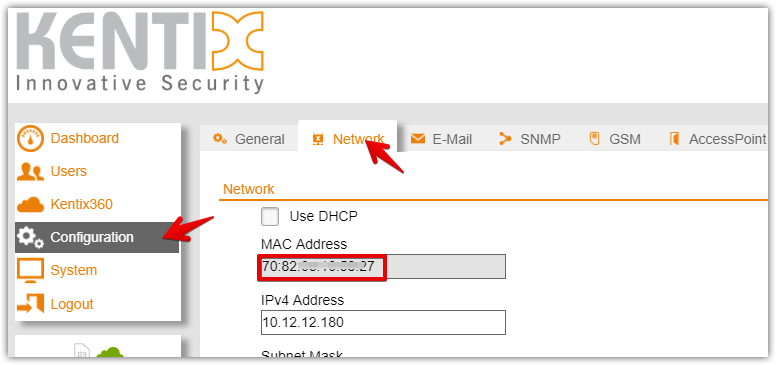
In a Browser Open the Kentix MultiSensor (KMS) GUI. Once logged in, navigate to System > License Management
Click on + button and Add the following license key: 5A40-2677-EA96-5F8D-C3C3-8C0C-9692-A033
Wait a few minutes to continue with the next step.
You will have to enter the device’s UUID which is the MAC address.
You can find the Unique ID string in Kentix GUI by navigating to Configuration > Network
Click on Search. The system should find your device. Follow screen prompts to add additional information about the device.
How to provision an ABP Tech IPTechView Security Gateway to the platform
Add the ABP IPTechView Security Gateway to the platform
Connect the ABP Tech IPTECHVIEW Security Gateway to the network (must have internet)
Let the device sit for 5-10 minutes to allow it to report to the cloud
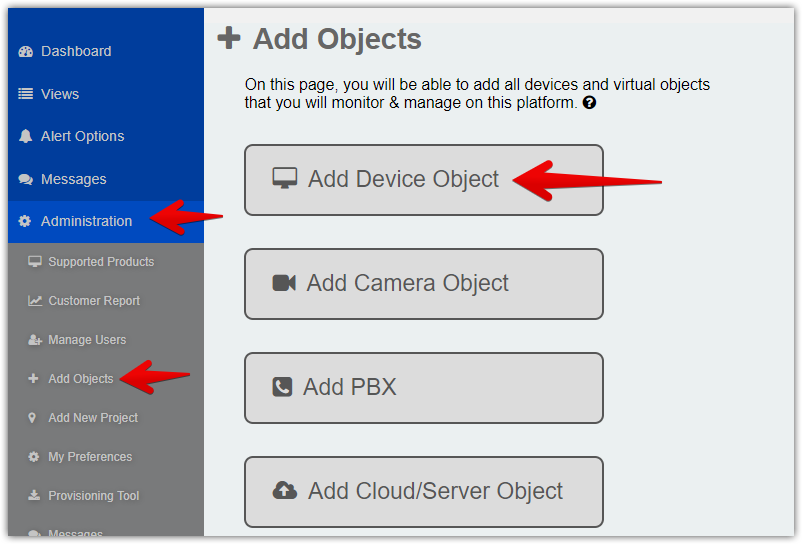
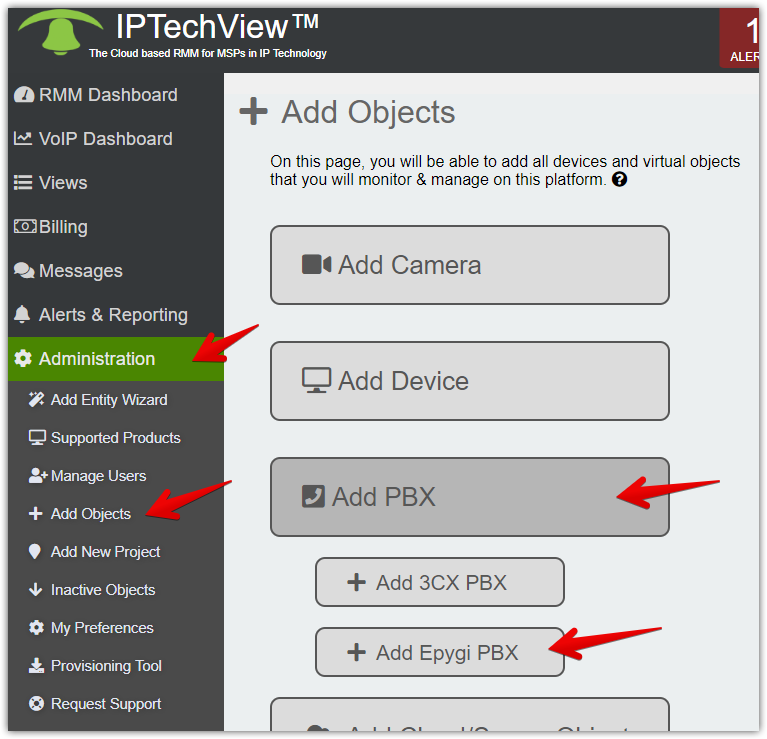
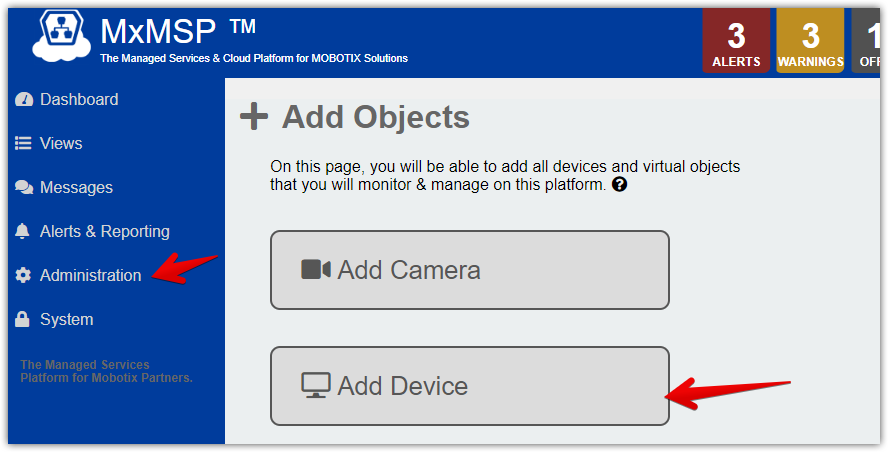
Navigate to the “Add a New Gateway” section on the IPTECHVIEW (Administration -> Add Objects-> Add Device-> Add IPTECHVIEW Security Gateway).
4. Search for the device using the serial number (example: 23234#######)
5. Assign the IPSecGateway to a profile & customize the entry into IPTECHVIEW
How to add 3CX to IPTECHVIEW
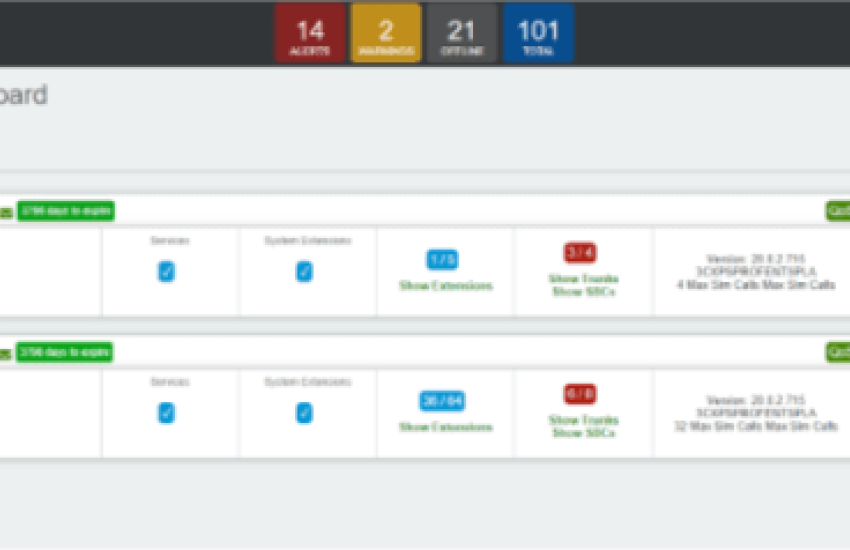
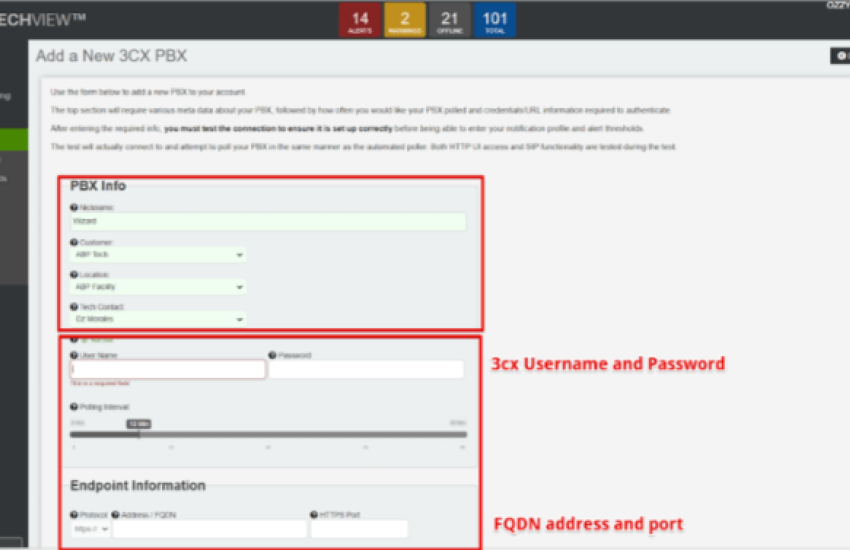
Step 1. Click on Dashboards and select VOIP Dashboards. Next Click on + icon on top right.
Step 2. Create a nickname and assign the 3CX to the customer and location with tech contact. Fill out PBX info with username and password and FQDN and port.
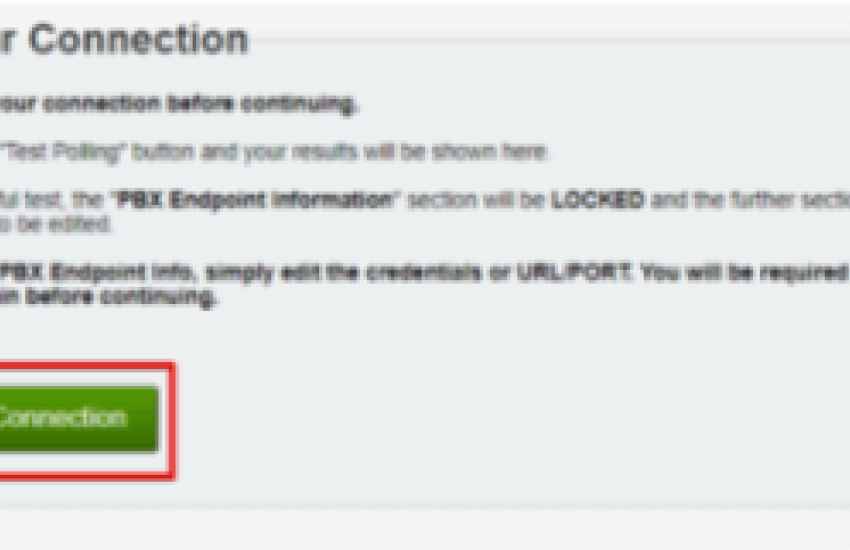
Step 3. Test PBX connection.
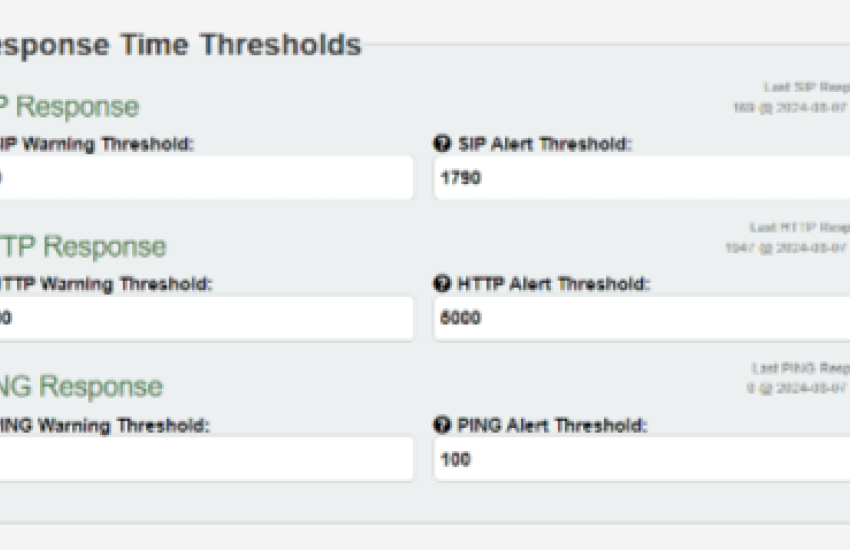
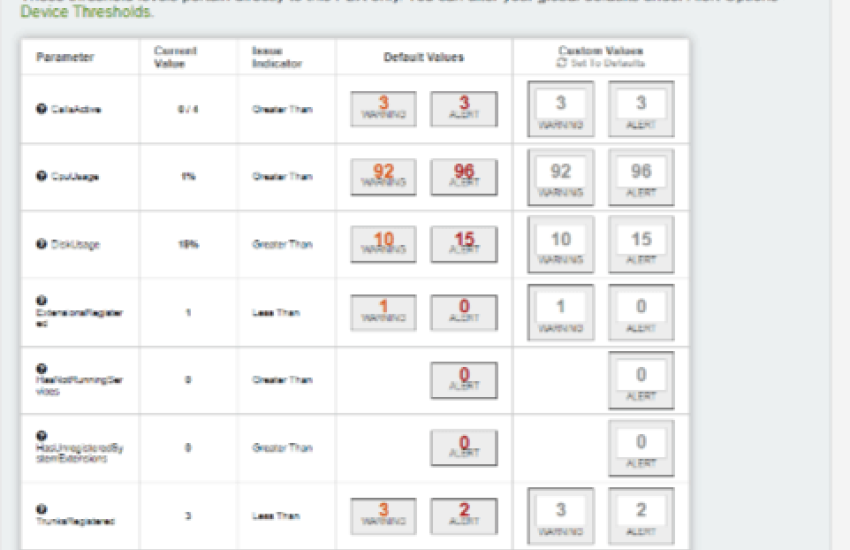
Step 4. Please fill in desired thresholds & values on when you would like to be warned and alerted and save changes.